

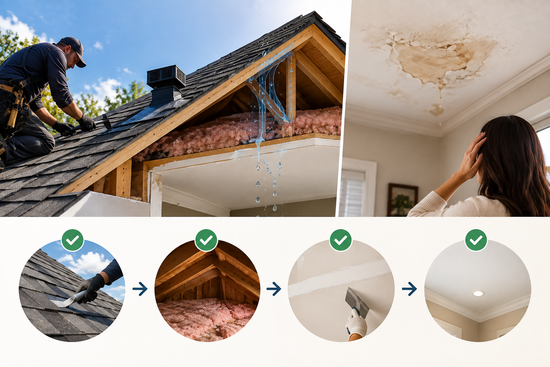
If you’ve ever spotted a brown ring on the ceiling or felt drywall crumble near a window, your first instinct might be to patch, prime, and repaint. It makes sense. Interior damage is what you see every day, and it feels like the quickest way to “get back to normal.” But if the source of the moisture is coming from above, fixing drywall before addressing the leak is like mopping the floor while the faucet is still running. In many cases, prioritizing roof repair first is the difference between a one-time fix and a frustrating cycle of repeat damage and rising costs.
This article breaks down why drywall-first repairs can backfire, what actually happens when water moves through a home, and how to make smarter decisions that protect your budget and your indoor air quality.
Why drywall is rarely the first problem
Drywall is a finish material. It’s not structural, and it isn’t designed to handle moisture. When it gets wet, it shows symptoms quickly:
- Staining and discoloration
- Soft spots, bubbling paint, peeling tape
- Sagging ceilings
- Cracks that reappear after patching
- A musty smell that lingers even after repainting
Those symptoms are real, but they are usually downstream of the real issue. Drywall is often the “messenger” that tells you water is getting in somewhere else. If you shoot the messenger by patching and painting first, the source can keep working in the background.
The hidden path water takes (and why your stain might be misleading)
One reason homeowners get stuck in repeated interior fixes is that water rarely drips straight down from the entry point. It travels.
Here’s what commonly happens:
- Water enters at the roof system (missing shingle, failed flashing, cracked boot, nail pop, lifted seam, damaged vent cap, ice-related backup, and more).
- It hits the roof decking or underlayment and starts moving along the path of least resistance.
- It follows framing, trusses, rafters, or the top chord of a truss.
- It can run to the nearest opening, like a recessed light can, a fan housing, or a drywall seam.
- Only then does it show up as a stain, drip, or sag.
That’s why a ceiling stain in a bedroom might actually be caused by a problem several feet away, sometimes even above a hallway, a bathroom vent, or a roof penetration you’d never connect to the room below.
If you repair drywall first without stopping the leak, you have not fixed the “plumbing” of the building. You have only covered the evidence.
The “drywall-first” cost trap: what people don’t factor in
A drywall patch itself may not be expensive. The trap is everything that comes with doing it before the leak is addressed.
1. You pay twice for the same work
Water stains often bleed through fresh paint. Tape joints can bubble again. Texture doesn’t hold. That means you are paying for:
- A patch
- Priming and painting
- Possibly repainting the entire ceiling for blending
- Then repeating it later
Even if you do the repair yourself, you are still paying in time, materials, and frustration.
2. Moisture can spread beyond the visible damage
Drywall can look “mostly fine” while insulation above it is saturated. Wet insulation holds moisture against wood framing and drywall paper. That creates conditions for:
- Wood swelling and warping
- Fastener corrosion
- Ceiling drywall losing strength and sagging
- Odors that become harder to remove
3. Mold risk increases when you delay the source fix
Mold is not guaranteed, but moisture plus organic material plus time creates a risk. Drywall paper, wood, and dust are food sources. If you repair drywall and close everything up while the roof leak continues intermittently, you may be building a perfect hidden environment for microbial growth.
4. Small roof problems often turn into larger roof problems
A small leak can be a simple flashing detail today and a larger deck repair tomorrow. Persistent moisture can weaken roof decking. That can raise the eventual repair cost significantly because now you’re not just addressing the entry point. You’re also replacing compromised materials.
When interior repairs should come first (yes, sometimes)
There are exceptions. Not every stain is a roof problem. Some common non-roof sources include:
- Plumbing leaks (supply lines, drains, wax rings, pipe joints)
- HVAC condensation (improperly insulated lines, clogged drain pans)
- Bathroom fan duct issues (warm moist air venting into attic space)
- Ice maker lines or upstairs appliance leaks
- Interior humidity and condensation (especially around poorly insulated areas)
If the evidence points strongly to plumbing or HVAC, the priority is still the same principle: stop the source first, then repair finishes.
The key is making sure you diagnose correctly before you spend money making things “look fixed.”
Signs you should suspect the roof before touching drywall
You do not need to be a roofing expert to notice patterns. Here are clues that often point upward:
- Stains appear or worsen after heavy rain
- Drips show up during wind-driven storms
- Wet spots appear near chimneys, skylights, or roof vents
- Staining grows in rings over time
- Attic inspection shows wet sheathing, dark streaks, or damp insulation
- The leak appears in winter during thaw cycles (could indicate backup issues)
If the problem changes with weather, it is a strong hint the building exterior is involved.
Why “quick cosmetic fixes” often fail
Paint alone is not a repair
Paint is not waterproofing. Even stain-blocking primer is not a solution if the material behind it is still damp. It is a cover.
Spackle does not restore compromised drywall
Drywall that has absorbed moisture can lose rigidity. You might patch a small soft area, but the surrounding paper can be weakened. When moisture returns, the repair can crack or loosen.
Texture and blending get expensive fast
Many ceilings have texture, and matching it is not always simple. When a stain reappears after you have already textured and painted, your “small repair” can become a larger rework.
A smarter order of operations: how to avoid paying twice
If you are dealing with ceiling or wall damage that could be water-related, this sequence usually reduces risk and cost:
Step 1: Treat it as an active issue until proven otherwise
Assume the leak is ongoing, even if you do not see dripping today. Many leaks are intermittent.
Step 2: Identify and stop the source
This might involve inspecting:
- Roof penetrations (vents, pipe boots, skylights)
- Flashing transitions (chimney, sidewalls, valleys)
- Shingle conditions and fastener issues
- Gutters and drainage patterns
- Attic ventilation and condensation contributors
Stopping the source is the actual “repair.” Everything else is restoration.
Step 3: Let materials dry fully
Drying is not just waiting until it “feels dry.” Moisture can be trapped above the drywall in insulation or framing. Depending on severity, drying may take days. In some cases, wet insulation needs removal because it will not dry effectively in place.
Step 4: Remove any compromised interior material
If drywall is sagging, crumbling, or moldy, replacement may be the best option. Patching over compromised drywall is often a short-lived fix.
Step 5: Repair and refinish the interior
Once the source is handled and the area is dry, interior repairs are far more likely to stay repaired.
What to do right now if you have a ceiling stain or soft drywall
You can take a few practical steps immediately, even before any contractor arrives:
- Document changes: take photos now and after storms.
- Check the attic safely (if accessible): look for wet insulation, dark streaking, or damp wood.
- Contain the risk: use a bucket if dripping is active. If the ceiling is sagging, keep people away from the area.
- Avoid sealing it up prematurely: do not just paint over it.
- Control indoor humidity: a dehumidifier can help reduce secondary damage while you work on the source.
A stain is information. Use it to guide the next step instead of hiding it.
The long-term value of fixing the source first
Choosing source-first repairs is not just about saving money on drywall. It affects the health and performance of the entire home:
- Preserves structural materials by preventing ongoing saturation
- Reduces mold and odor risk by limiting moisture duration
- Improves indoor comfort by keeping insulation dry and functional
- Prevents surprise escalation where a small problem becomes a bigger project
- Protects your time by avoiding repeat repairs and recurring stains
Interior finishes are meant to be the final layer. When they keep failing, the building is telling you something.
Bottom line: the best-looking repair is the one you only pay for once
It is tempting to fix what you can see. Drywall patches make progress feel immediate. But when water is involved, the smartest move is almost always to stop the source before you restore the surface.
If you take only one idea from this article, make it this: interior damage is usually the symptom, not the cause. Fix the cause first, let the area dry, then repair drywall with confidence. That is how you avoid the cycle of stains that come back, paint that bubbles again, and “small fixes” that quietly become big expenses.